
|
Recent Posts Released! The Registration User Interface Generating Unique Registration Numbers My Product Registration Solution Still Thinking About Product Registration The Leopard Dilemma iPhone Envy C4 - Day 3 C4 - Day 2 C4 - Day 1 |

Cocoa Backgrounds Tutorial 1.1
Monday, January 8, 2007
 Recently I wanted to add a gradient background to a window. I was able to get something working pretty quickly, but I wasn't really sure I'd selected the best solution. So to satisfy my curiosity, I created a new project and tried out a bunch of different ways of putting images behind controls in a Cocoa window.
You would think it would be easy, but putting an image background behind buttons and other objects isn't as simple as adding an NSImageView in Interface Builder and selecting "Move to Back," because Cocoa doesn't support overlapping NSViews. I learned this the hard way.
So I'd like to walk you though a few of the ways you can create backgrounds, both for just a small area of the window, and for the entire window. There's a lot of code here, but you don't need to copy and paste from this page. Just download the associated example project:
Download: DBBackgroundCheck 1.1
Keep in mind that I'm not recommending that you should be adding nasty backgrounds to your windows like I've done for this tutorial. But this is the Delicious Generation, and sometimes a simple gradient can bring your application up to the current state-of-the-art in Mac interface design.
Although this is a very basic-level tutorial, if you've never subclassed NSView or worked with NSImage, start by reading Scott Stevenson's excellent Intro to Quartz II tutorial. It will give you the background (pun intended) that you need to understand the information presented here.
Use a Custom View as a Background
 Let's start by placing a background in just part of the window. We'll do this by subclassing NSView in Xcode. Then in Interface Builder we'll drag an NSView object to our window and change its class to our new class.
In Xcode, take an existing project, or create a new Cocoa application project, and then select "New File" from the File menu. In the Assistant dialog that immediately appears, select the "Objective-C NSView Subclass" option. Name the new class "ViewBackground" and click Finish. The .m file created for you will include a method to override NSView's -drawRect: method. That's where we'll add our code to draw the background.
Drag the new view's .h file onto your NIB window in Interface Builder so it knows about the new class, then switch to Interface Builder so we can add the custom NSView to our window.
Drawing a custom NSView is easy, but we want to use this view as a background for other objects. So we'll add some buttons, labels, and other objects to our custom view to make sure it works properly as a background.
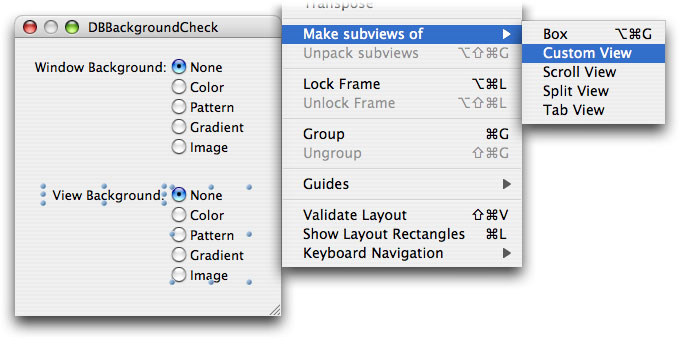
Since you can't overlap NSViews (and almost everything in Interface Builder is a subclass of NSView), you must combine any controls or other objects so that they're subviews of the custom NSView that will display your background. There are two ways to do this. The first is to drag objects from the palette and drop them on top of the NSView object. The other is to select a group of existing objects and then select the "Make subviews of Custom View" menu command.
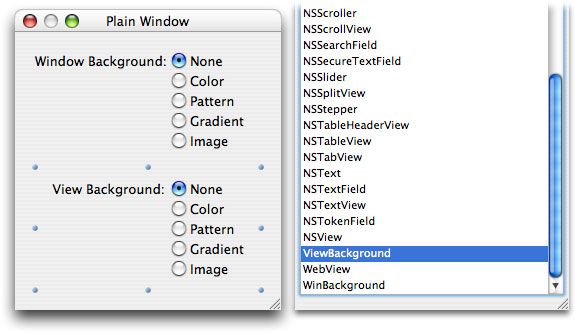
Finally, change the NSView's class to our new custom class.
Now we'll switch back to Xcode and modify the -drawRect: method to draw the background.
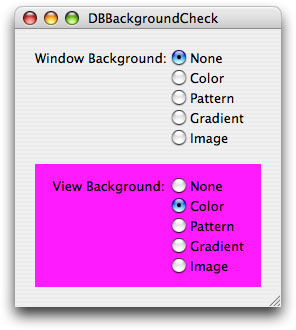
Color View Background
Let's start with a simple color background. We'll just fill a rect with a color in the &endash;drawRect: method:
{
ĀĀĀĀ[[NSColor magentaColor] set];
ĀĀĀĀNSRectFill(rect);
}
Now build and run. If all goes well, the custom NSView is filled with the color.
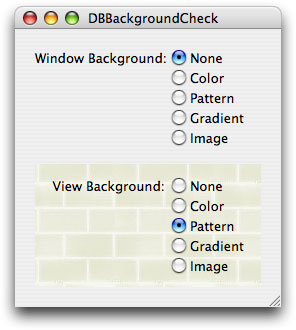
Pattern View Background
Next, we'll draw a simple pattern in the view. NSColor has a neat method named &endash;colorWithPatternImage: that allows you to use an image as a pattern that can pass itself off as an NSColor instance. So rather than worrying about drawing the image multiple times, we can just use this type of color to draw the pattern.
{
ĀĀĀĀĀĀ// Stick the image in a color and fill the view with that color.
ĀĀĀĀNSImage *anImage = [NSImage imageNamed:@"bricks"];
ĀĀĀĀ[[NSColor colorWithPatternImage:anImage] set];
ĀĀĀĀNSRectFill([self bounds]);
}
Notice that this time we're filling the view's bounds, not the rect parameter.
At first glance it looks great, but you'll notice that when you resize the window, the pattern moves down with the bottom of the window. That's not what a user would expect to see. The top-left brick should remain stationary so the bricks don't look like they're moving as the window height changes. This happens because Cocoa's coordinate system starts in the lower-left corner, not the top-left corner. Fortunately, we can temporarily modify this behavior in our custom view while we draw the background by messing with the current graphics context's pattern phase. We start by saving the current pattern phase value, changing it, doing our drawing, then restoring the original value. Replace the code in the -drawRect: method with this:
[[NSGraphicsContext currentContext] saveGraphicsState];
ĀĀ// Change the pattern phase.
[[NSGraphicsContext currentContext] setPatternPhase:
ĀĀĀĀNSMakePoint(0,[self frame].size.height)];
ĀĀ// Stick the image in a color and fill the view with that color.
NSImage *anImage = [NSImage imageNamed:@"bricks"];
[[NSColor colorWithPatternImage:anImage] set];
NSRectFill([self bounds]);
ĀĀ// Restore the original graphics state.
[[NSGraphicsContext currentContext] restoreGraphicsState];
Why do we mess with the graphics context rather than just overriding NSView's &endash;isFlipped method? Because that would change the coordinate system for the contents of the view as well as the background. Objects placed in the view in Interface Builder would be displayed incorrectly. We won't have this problem using the technique shown above.
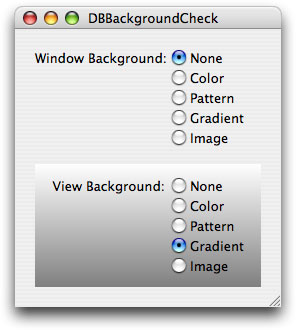
Gradient View Background
How about a gradient? Drawing a gradient takes a bit of code, so rather than dealing with that we'll just use Chad Weider's CTGradient class. It can fill a rect with a gradient with just one line of code.
So this one's really easy. We just ask the CTGradient class to draw directly into the view's bounds:
{
ĀĀĀĀNSColor *beginColor = [NSColor whiteColor];
ĀĀĀĀNSColor *endColor = [NSColor grayColor];
ĀĀĀĀCTGradient *gradient = [CTGradient gradientWithBeginningColor:beginColor
ĀĀĀĀĀĀĀĀendingColor:endColor];
ĀĀĀĀ[gradient fillRect:[self bounds] angle:270];
}
We can improve this code by creating the gradient just once in the view's -init method and storing it in an instance variable. Then we just need to call its -fillRect:angle: method in the -drawRect: method. To keep the code as simple as possible I didn't do this in the example.
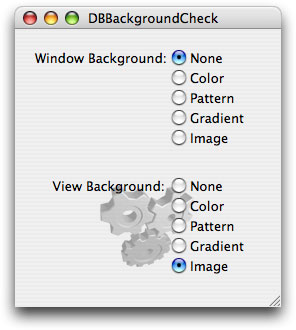
Image View Background
Drawing a centered image is almost as easy. Just find the center of the view and start drawing:
{
ĀĀĀĀĀĀ// Load the image.
ĀĀĀĀNSImage *anImage = [NSImage imageNamed:@"smallgears"];
ĀĀĀĀĀĀ// Find the point at which to draw it.
ĀĀĀĀNSPoint backgroundCenter;
ĀĀĀĀbackgroundCenter.x = [self bounds].size.width / 2;
ĀĀĀĀbackgroundCenter.y = [self bounds].size.height / 2;
ĀĀĀĀ
ĀĀĀĀNSPoint drawPoint = backgroundCenter;
ĀĀĀĀdrawPoint.x -= [anImage size].width / 2;
ĀĀĀĀdrawPoint.y -= [anImage size].height / 2;
ĀĀĀĀ
ĀĀĀĀĀĀ// Draw it.
ĀĀĀĀ[anImage drawAtPoint:drawPoint
ĀĀĀĀĀĀĀĀĀĀĀĀĀĀĀĀfromRect:NSZeroRect
ĀĀĀĀĀĀĀĀĀĀĀĀĀĀ operation:NSCompositeSourceOver
ĀĀĀĀĀĀĀĀĀĀĀĀĀĀĀĀfraction:1.0];
}
Use the Custom View as the Window Background
Now that we've got a custom view, it would be nice to be able to use it for the entire window, not just a rect. Of course, you could make the rect large enough to fill the window, but then every object in the window would need to be a subview of the background view. That's going to make it difficult to create and maintain the window in Interface Builder.
Fortunately there's an easy solution. Every window already has a top-level NSView called the Content View. All we need to do is change this view's class to our ViewBackground class. We get total control over it just like we had with the smaller custom view, but it's much easier to work with in Interface Builder.
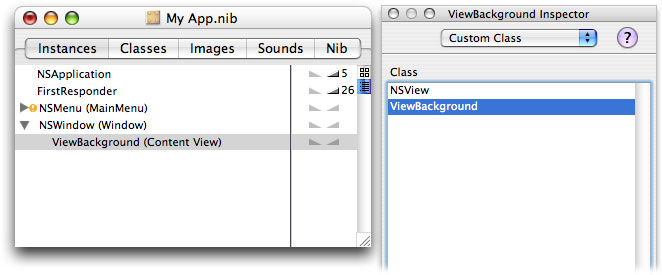
In the primary NIB window in Interface Builder, select your window's icon and then switch to the outline view by clicking the second small button right above the vertical scroll bar.
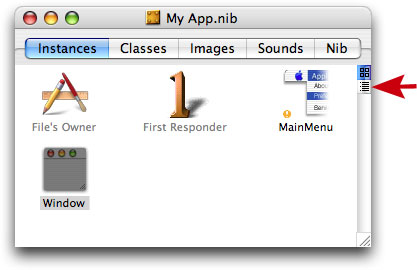
Click the triangle next to your window to expand the outline. Highlight the "NSView (Content View)" line, then change the class to "ViewBackground" in the Inspector palette.
Now your custom view will be used to draw the window's background. Any of the techniques described above will work when drawing the window's background.
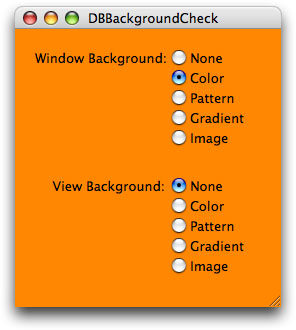
Color Content View Background
For example, here's the background we get when we just fill the view with a color. This time we're passing the -orangeColor message to NSColor.
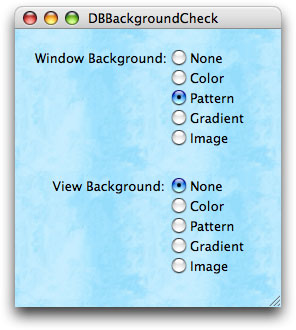
Pattern Content View Background
Here's what we get when we use NSColor's -colorWithPatternImage: method. We've changed the image name this time to "ice".
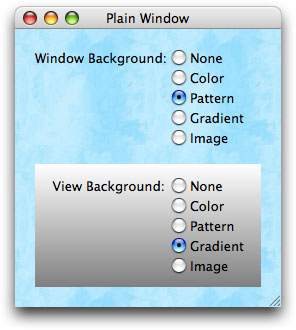
Gradient Content View Background
Now we'll use CTGradient again, but we'll go from white to blue.
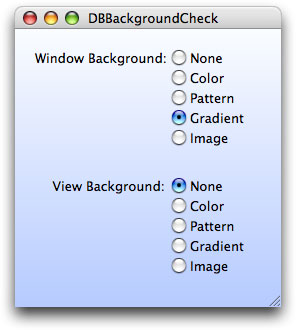
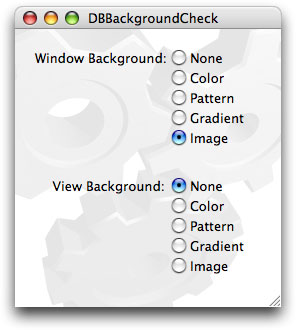
Image Content View Background
And finally, we'll draw an image in the background. This is a different image with a larger size and greater transparency.
Using a Textured Window Background
Here's a totally different technique that requires just a little code and no custom classes. So start with a different window, or reset your window's Content View back to the NSView class.
NSWindow has a method named -setBackgroundColor: that allows you to (...wait for it...) set a window's background color. Use this method once to set the window's background, and NSWindow handles the rest. Using this technique works great if you just want to fill the window with a solid color, but it doesn't work so well with images. That's because it draws from the bottom-left corner of the window, and you can't easily change this like you can with a custom view. Also, the background pattern doesn't always draw from the zero vertical coordinate. Sometimes, depending on the window size, the origin is set a few pixels above the zero vertical coordinate. This will cause the image to appear to bounce a little as the window is resized.
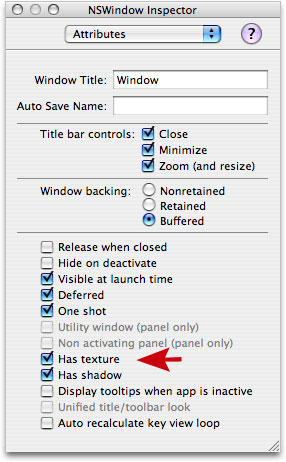
Fortunately both of these problems are fixed if we click the window's "Has texture" checkbox in Interface Builder. Additionally, this causes the window frame to be drawn using the background color or image. So we'll get a very different look using this technique.
First, we need to add an NSWindow outlet to our project, connect it to the window in Interface Builder. Once we've done this, we can set the window's background color in our application delegate method, usually in the -awakeFromNib method.
In Interface Builder we're going to select the window's "Has texture" checkbox in the Attributes area of the Inspector palette.
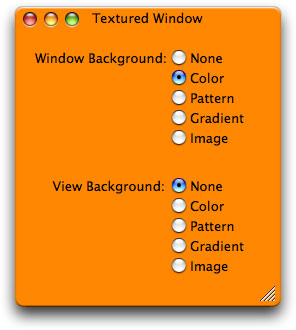
When we run our project, instead of drawing the usual brushed metal window, the color we've passed with the -setBackgroundColor: message will be used instead. But not just for the content area of the window. The entire window frame will be drawn using our color.
Color Window Background
For example, to set a solid background color, just pass a simple NSColor value.
Remember that we're calling this code from the window or app controller's &endash;awakeFromNib method. If you want to do it after the window is already visible, you'll need to follow it with a call to NSWindow's -display method to force the window to redraw its frame using the new background color.
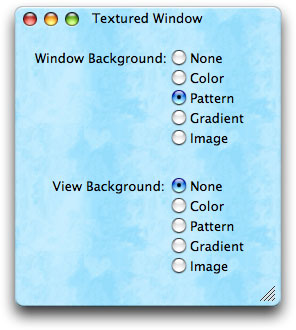
Pattern Window Background
The only thing we can pass to NSWindow to use as a background is an NSColor value. So to draw a pattern we'll need to use NSColor's -colorWithPatternImage: method again.
NSColor *theColor = [NSColor colorWithPatternImage:theImage];
[theWindow setBackgroundColor:theColor];
Now you've got a tiled background behind the objects in your window.
Gradient Window Background
This time we want to do is draw a gradient image that's one pixel wide (or 1 pixel tall, depending on the direction of the gradient) and as tall as the window, and let NSWindow use that as the background pattern.
Create a method named -drawWindowBackgroundGradient with this code:
NSRect gradientRect = NSMakeRect(0,0,1,[theWindow frame].size.height);
NSImage *gradientImage = [[NSImage alloc] initWithSize:gradientRect.size];
ĀĀ// Fill the image with a gradient using the CTGradient class.
[gradientImage lockFocus];
NSColor *beginColor = [NSColor whiteColor];
NSColor *endColor = [NSColor colorWithCalibratedRed:0.7 green:0.8 blue:1.0
ĀĀĀĀalpha:1.0];
[[CTGradient gradientWithBeginningColor:beginColor endingColor:endColor]
ĀĀĀĀfillRect:gradientRect angle:270];
[gradientImage unlockFocus];
ĀĀ// Set the gradient image as the window's background color.
[theWindow setBackgroundColor:[NSColor colorWithPatternImage:gradientImage]];
ĀĀ// Release the image.
[gradientImage release];
Call this initially in -awakeFromNib to draw the gradient.

However, if the window is resized our gradient image may no longer be the correct height for the window. So we need to update the background image whenever the window is resized. To find out when the window is resized we can either set the window's delegate to our app controller in Interface Builder, or we can just let the application's NSNotificationCenter instance know we're interested:
ĀĀĀĀĀĀĀĀĀĀĀĀĀĀĀĀĀĀĀĀĀĀĀĀĀĀĀĀĀĀĀĀĀĀĀĀĀselector:@selector(windowDidResize:)
ĀĀĀĀĀĀĀĀĀĀĀĀĀĀĀĀĀĀĀĀĀĀĀĀĀĀĀĀĀĀĀĀĀĀĀĀĀĀĀĀ name:NSWindowDidResizeNotification
ĀĀĀĀĀĀĀĀĀĀĀĀĀĀĀĀĀĀĀĀĀĀĀĀĀĀĀĀĀĀĀĀĀĀĀĀĀĀ object:theWindow];
Then we need to create a simple method named -windowDidResize: to call our &endash;drawWindowBackgroundGradient method when the window is resized:
{
ĀĀĀĀ[self drawWindowBackgroundGradient];
ĀĀĀĀ[theWindow display];
}
Notice that we tell the window to redraw itself here using the -display method.
Don't forget to remove the observing method in the application or window's &endash;dealloc method:
{
ĀĀĀĀ[[NSNotificationCenter defaultCenter] removeObserver:self
ĀĀĀĀĀĀĀĀĀĀĀĀĀĀĀĀĀĀĀĀĀĀĀĀĀĀĀĀĀĀĀĀĀĀĀĀĀĀĀĀĀĀname:NSWindowDidResizeNotification
ĀĀĀĀĀĀĀĀĀĀĀĀĀĀĀĀĀĀĀĀĀĀĀĀĀĀĀĀĀĀĀĀĀĀĀĀĀĀĀĀobject:theWindow];
ĀĀĀĀ[super dealloc];
}
Image Window Background
Now what if you want a single image centered in the window? This time, we need to create an image that's the same size as the window, and once again use NSWindow's &endash;setBackgroundColor: method to stick it in the window.
NSSize backgroundSize = [theWindow frame].size;
NSImage *backgroundImage = [[NSImage alloc] initWithSize:backgroundSize];
NSRect backgroundRect = NSMakeRect(0,0,[backgroundImage size].width,
ĀĀĀĀ[backgroundImage size].height);
ĀĀ// Load whatever object will be in the center into an NSImage.
NSImage *objectImage = [NSImage imageNamed:@"largegears"];ĀĀ
ĀĀ// Find the point at which to draw the object.
NSPoint backgroundCenter;
backgroundCenter.x = backgroundRect.size.width / 2;
backgroundCenter.y = backgroundRect.size.height / 2;
NSPoint drawPoint = backgroundCenter;
drawPoint.x -= [objectImage size].width / 2;
drawPoint.y -= [objectImage size].height / 2;
ĀĀ// Fill the background with a color and draw the object on top of it.
[backgroundImage lockFocus];
[[NSColor whiteColor] set];
NSRectFill(backgroundRect);
[objectImage drawAtPoint:drawPoint
ĀĀĀĀĀĀĀĀĀĀĀĀĀĀĀĀfromRect:NSZeroRect
ĀĀĀĀĀĀĀĀĀĀĀĀĀĀ operation:NSCompositeSourceOver
ĀĀĀĀĀĀĀĀĀĀĀĀĀĀĀĀfraction:1.0];
[backgroundImage unlockFocus];
ĀĀ// Set our background image as the window's background color.
[theWindow setBackgroundColor:
ĀĀĀĀ[NSColor colorWithPatternImage:backgroundImage]];
ĀĀ// Release the image.
[backgroundImage release];
Notice that we draw a white background behind the image. That's because the normal window background won't be drawn at all, so we must draw everything that will be displayed. If you want the standard window background behind your image, you'll need to find a way to draw it yourself. Or you can use the NSView technique described later in this tutorial.
Now we've got an image that's centered in the window.

As with the gradient background, we'll need to be notified each time the window is resized so we can update our background image.
Wrap-Up
I think I've covered all of the different options for creating backgrounds in Cocoa. But if I've missed something please let me know and I'll update this tutorial.
And remember, just because you can add an ugly background to your window, it doesn't mean you should. So please, code with care.